Full-Duplex audio recording on Linux, for Skype and other VoiP
I've recently had the need to record a phone-call made via Skype. This need can come up for lots of reasons, for example to keep a record of information you provide over the phone when taking out an insurance policy. There are a number of means to achieve this, but I've used a generic method of recording both PC and microphone audio using PulseAudio - which is applicable to any application or VoiP service. There are other guides on how to do this, but I didn't find any of them as easy to follow or complete as I'd like, so I've written my own.
Remember - there may be legal restrictions on call recording in your location. You may need to inform the other party if they are being recorded. So use this guide at your own risk - I am no expert on matters of law.
Firstly, you need to install PulseAudio Volume Control. This is a nice utility that allows mapping between audio-devices, in order to stream your PC's sound to your recording application. On Ubuntu, you can install it like so:
sudo apt-get install pavucontrol
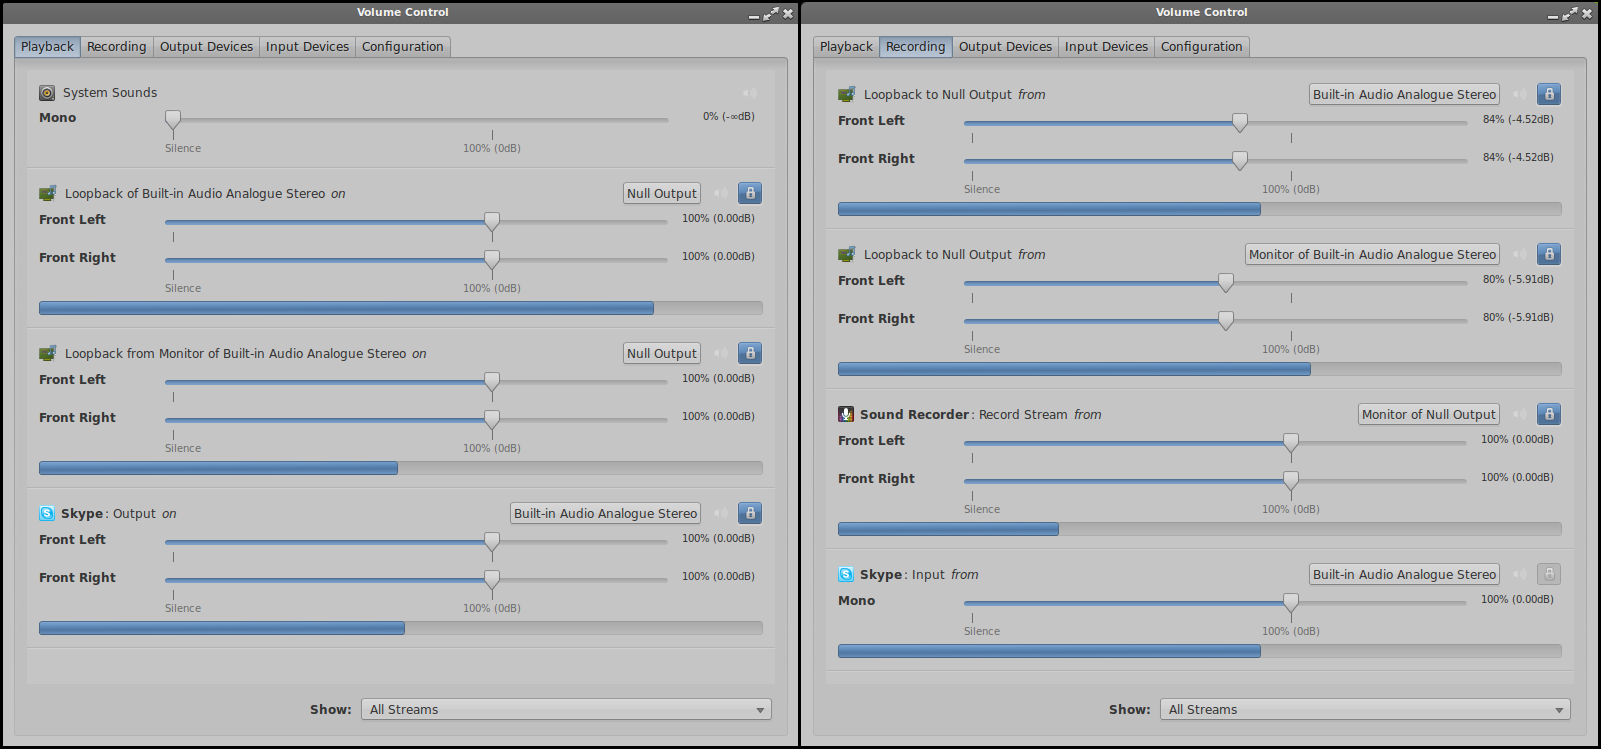
Now, run PulseAudio Volume Control - it should now be in your Applications menu somewhere. You should see some out-of-the-box devices like 'Built-in Analogue Audio Stereo' which represents your PC sound hardware. We first want to make sure that none of your key devices are 'muted', which would definitely inhibit recording! Go to the Input Devices tab - Show "Monitors" (from the drop-down at the bottom) and make sure 'Monitor of Built-in Audio Analogue Stereo' is not muted, as this is a virtual device that allows recording of the sound output of your PC. Also make sure your microphone input under 'Built-in Analogue Audio Stereo' is not muted, as you will need this to record your side of the conversation.
Now we need to drop to the command-line. These commands below will create a 'sink' and two 'loopbacks':
pactl load-module module-null-sink sink_name=myaudiosink
pactl load-module module-loopback; pactl load-module module-loopback
The 'sink' is a device that allows combining of multiple audio streams, and you need this to record both the PC audio and microphone input at the same time (ie, both sides of your Skype conversation). The 'loopback' is a way of looping audio from one of the 'real' hardware devices into your sink.
Now, return to PulseAudio Volume Control. Under the 'Playback' tab, set the two new Loopbacks to 'Null Output', as this is your sink. Then, under the 'Recording' tab, set the two new Loopbacks to 'Built-in Audio Analogue Stereo' and 'Monitor of Built-in Audio Analogue Stereo' respectively, (it doesn't matter which is which), as this will route your PC and microphone audio through the loopbacks.
Now, start Gnome Sound Recorder or the audio recording app of your choice, and press record. The recording app will appear in the 'Record' tab of PulseAudio Volume Control. It should be recording from the 'Monitor of Null Output' to capture all audio going in to your sink, so set it to do this if it is not.
Then, run Skype (or whatever app you want to record audio from). Once you start a call, Skype should appear under both the Recording tab and Playback tab in PulseAudio Volume Control. It should be recording and playing back to Built-in Audio Analogue Stereo, which would be as per normal.
Through the magic of PulseAudio - Gnome Sound Recorder should be recording all of the microphone input plus any audio that's coming from the other end of your Skype conversation! Below are screenshots of PulseAudio Volume Control, in the state that it should look while successfully recording your Skype call:
Note that the above settings will not be maintained through a reboot. You'll need to add them to your PulseAudio config to do this - and you'll need to search elsewhere for how this is done.
Problems?
Whilst experimenting with this set up, I found I messed up my PulseAudio configuration at one point, and PulseAudio started crashing. If you find you have any problems with your PulseAudio config, it's possible to delete the pulse-audio config local to your user account and then re-create it using the following two commands:
rm -rf ~/.pulse
pulseaudio -k
I hope you find this guide useful. And remember to check the legality of what you're going before you try this out on a real call!
Comments
Leave a comment
Allowed XHTML tags: <p, ul, ol, li, dl, dt, dd, address, blockquote, ins, del, span, bdo, br, em, strong, dfn, code, samp, kdb, var, cite, abbr, acronym, q, sub, sup, tt, i, b, big, small>
Comment by Erik Moeller [Visitor] — 02/01/18 @ 18:55